BOOKBINDING - Lesson 3 —. 19/1/21
The audio version of this post is available HERE
First of all, my apologies that this post has been a little slow in coming, but the marmalade season is upon me (about which I may formulate a post in due course...)
Anyway, this lesson is about how to make books with more than one section, which is where things start to get a bit more complicated - and a bit more difficult to explain!
There are various ways to connect a number of single sections to make a bigger book. The easiest ones are called 'non-adhesive' bindings - and also long stitch bindings - and are what we'll be focusing on here.
Historically, this and other very simple forms of binding go back to, if I remember rightly, the 15th century, a time when students had to provide their own text books. These arrived from the printer's as unbound sheets and the students invented some very ingenious ways of keeping them together. Somewhere there is a photo of said books, from a museum, but the internet is being very close-fisted just now...
First of all, the term 'non-adhesive' - in general, this means no glue has been used to join the separate sections into a more solid block once they have been sewn. It is quite acceptable however to use glue in the construction of the outer cover, as this photo shows:
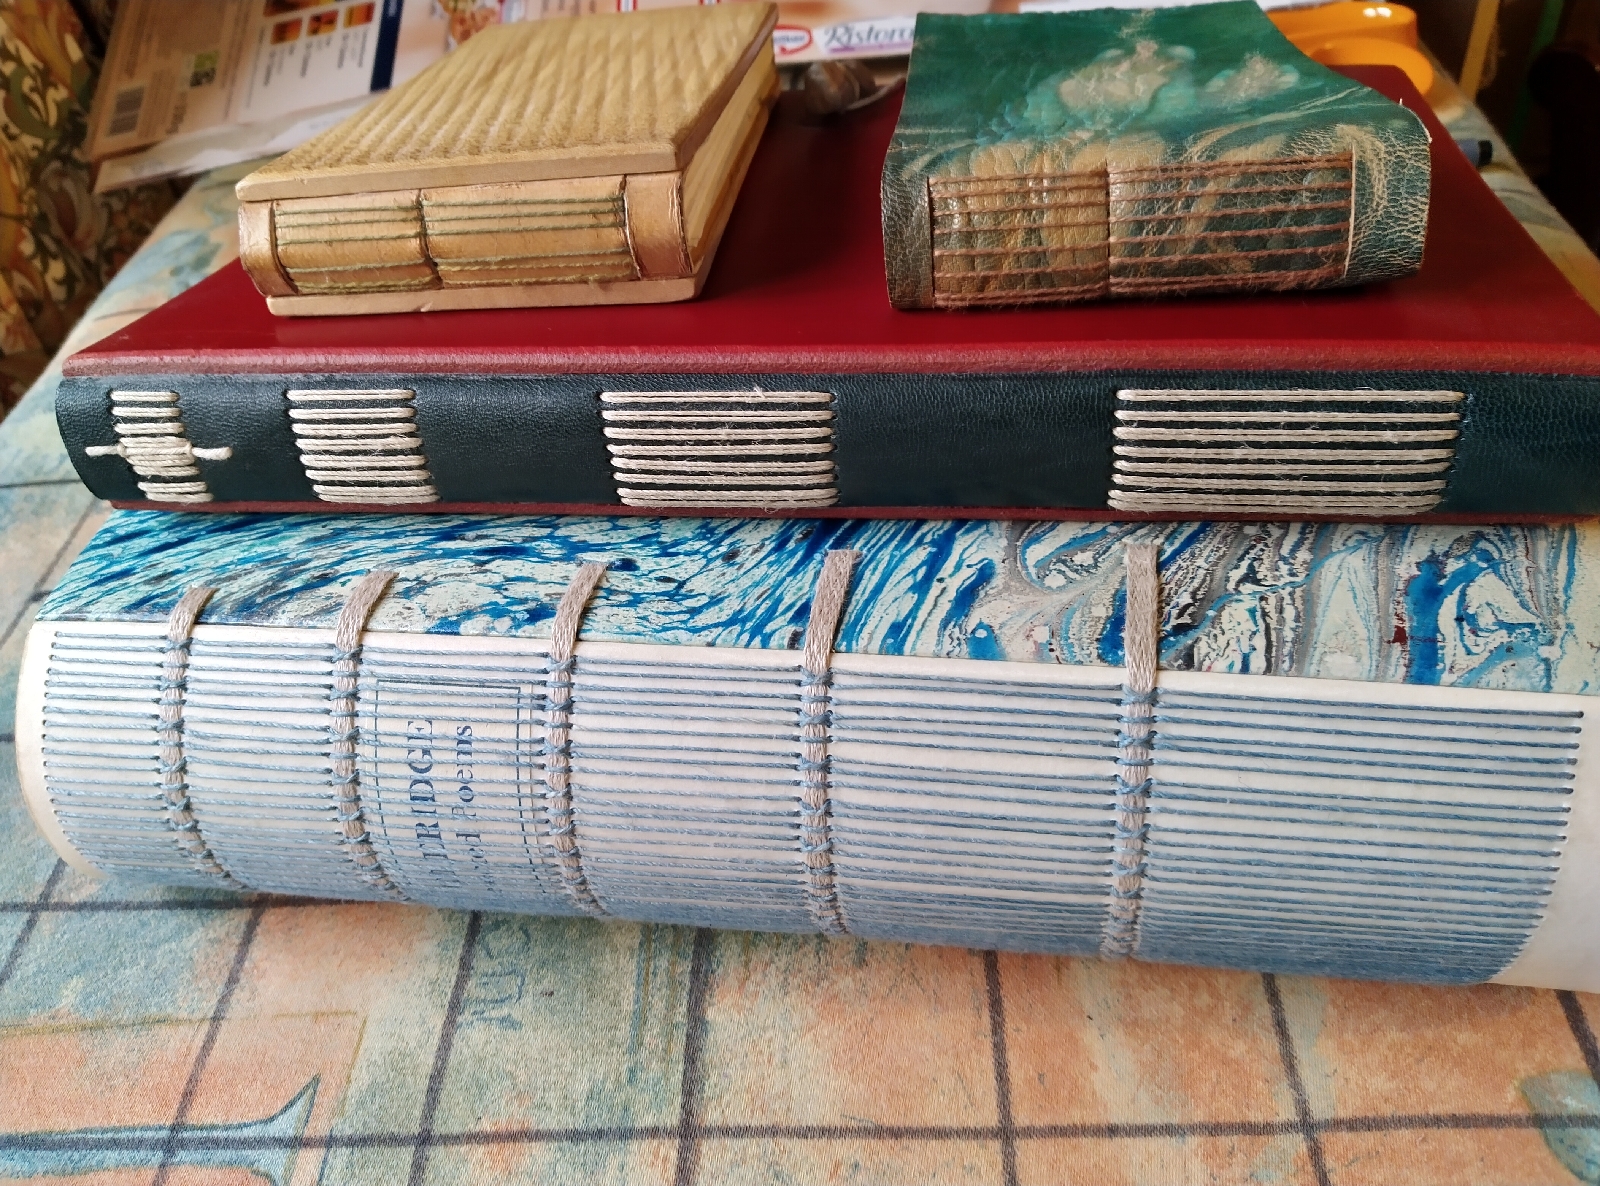
The large book at the bottom is a collection of poems by Coleridge (which I did for a competition). The sewing looks - and is quite complex, but is essentially still single sections sewn individually. That and the journal above it, with cowhide boards and a leather spine, have been sewn through individual punched holes (a little more planning, but a neater look) and the two smaller journals are just a long strip of leather on the one hand and two wooden boards joined with a leather spine on the other. The possibilities are endless.
So, first of all, cut and fold up six to eight sections: I actually find it easiest to cut the paper into strips to form the sections, that way there are no messy folds at the top to cut later. Sandwich between boards in a couple of even heaps and, if you have a press of some sort, then give them a good squeeze. If you do not have a press, do not despair - that's where the heavy weight/s (mentioned in the Introduction) come in. Simply place a weight or two - or a couple of heavy books - on top and leave for several hours.

Then remove the weights and allow the sections to 'breathe' a little. Without compressing the pile too much, measure the thickness (and make a note of it!). Leave the pile under a very gentle pressure - a small paperback will do - until needed.
Now we move on to making a cover... Before going any further, I should explain that generally the book cover is very slightly bigger than the actual page size - 3mm to 4mm at top, bottom and fore-edge (front). This is known as the 'square'. First off we will make a simple paper wrap: this needs to be the page height plus, say, ca. 6mm (3mm at top, 3mm at bottom, effectively). The length needs to be the page width times four, plus 6mm (3mm at each foredge) plus the spine, which will be the thickness measurement you took earlier, plus a 'smidge'. Side note: when I was at college, one of the students caused great hilarity by very earnestly asking our tutor exactly what a 'smidge' was... A smidge - well, it's a smidge... You should have something like this:

In general terms, it's good practice to make a paper mock-up first, this way you can check everything is looking the way you want and, if it's not, make adjustments; it is also useful to work out where you want the hole spacing. I was unable to find any thick coloured paper for this project, so am improvising by using an old pizza box.

Sadly it's not quite wide enough, but we'll work round that. Thus I am making quite a small book for an imaginary friend who is a) a pizza officionado and b) is geeky enough to keep notes on each type they buy..... I'm sure such people exist... somewhere...
Having made your draft, transfer the markings to the back of the cardboard.

Using an awl - or better still a small hole punch - make a hole at each end of the horizontal spine lines. It's advisable to do this on something like an old piece of cardboard, or a cork sanding block, so as not to damage your cutting mat.

Then use a knife and ruler to connect each pair of holes. Whilst a single slit will work, it is better to cut the slit about 1mm wide, to allow space for the threads. Because this particular cardboard is so soft, I've 'reinforced' the inside of the slits with a little PVA.

If you find yourself getting hooked on this method of making a book, then I would always recommend strengthening the spine with a strip of something - be it strong paper, fabric or... whatever.
Take out your stack of folded sections, 'knock them up' to the head and the spine, so those edges are aligned. With the spine towards you, use a pencil to draw a firm line across said spine, near the top.

This makes it much easier to make sure your sections are the right way up when piercing and sewing in! Then make up your piercing guide and use this to make the sewing holes in the spine of each section.
Now the fun starts: take a section and carefully sew it through the slots and over the spine. Tie-off inside. It wants to be snug, but not tight (otherwise the threads may damage the cardboard). Go on to the next section... and the next... etc. I find it easiest to hold the cover and section in my left hand while sewing:


It is perfectly possible that you may find you cannot get all your sections in - in which case just leave the extras aside - or that you need another section or two to fill things up (I had planned for six, but actually found I had to hastily cut and fold another two more sections!). When sewing, the sections want to be quite snug against each other, but not crammed-in, otherwise the book won't close properly.
Once that's done, you can fold-in the two cover pieces, so that the very outer edge comes to rest just shy of the spine sewing. By all means use a line of glue to anchor it in place. Et voilà. In the case of our little pizza book, the edges will fall a little short, but I'm sure our pizza-eating friend will still be delighted 😃

Once you have mastered the basics using simple card, you can go on to make the cover out of different things, as in the first photo of this post - leather perhaps or even, heaven forbid, a strip of plastic! Also, you can make up two cover boards covered in, say, fabric and joined by a strip of something strong for the spine, along the lines of the journal cover I showed at the top of Lesson 1:

This sort of thing will be the topic of the next post but, in the meantime, have a play with whatever is to hand, while I get back to my marmalade...
I can't stress enough that experience only comes with practice - even with failures! In my first year at college, I made over a hundred small books of one sort or another - much to the despair of my poor professors, who expected their pupils just to make what was taught in class...... <sigh>

These are a few of the simple little books I made 'on the side' at college, using whatever was to hand. From left to right: brown clothing leather; green snakeskin; natural 'skiver' over padded boards; green leather with gold paint rubbed into the grain; green leather with red spine slips; simple bookbinders board; handmade paper; a very small book with cow-hide boards (by the way, each square on the ironing board's cover is 5cm... which gives you an idea of size).
Comments